![]()
How to enable
Active Directory authentication
in PRTG in 4 steps
By default, PRTG uses its own internal user account database to authenticate users. For many PRTG
customers, particularly those with smaller networks, this local authentication meets all their needs.
But for PRTG customers who have more complex environments and infrastructures or who want to reduce the number of authentication mechanisms in their networks, PRTG offers Active Directory (AD) integration as well.
This way, all members of the AD user groups that are mapped to user groups in PRTG during the integration can log in to PRTG with their AD domain credentials afterward.
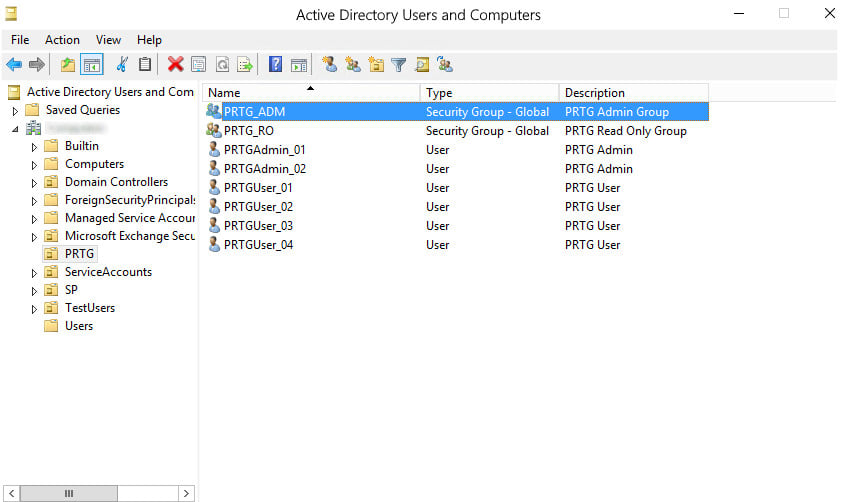
In the AD, make sure that users who require the same access rights for PRTG are in the same AD user group.
In our example, the AD user group PRTG_ADM contains the two administrator user accounts that later have administrative rights in PRTG and that can also manage access rights and cluster setups and change the monitoring configuration of PRTG. The AD user group PRTG_RO contains the four user accounts that later have only read access rights in PRTG.
Make sure that the PRTG core server system is a member of the AD domain with which you want to integrate it. You can check and, if necessary, change this setting via the Windows Control Panel:
- Navigate to System.
- Go to section Computer name, domain, and workgroup settings.
- Check the settings Full computer name and Domain.
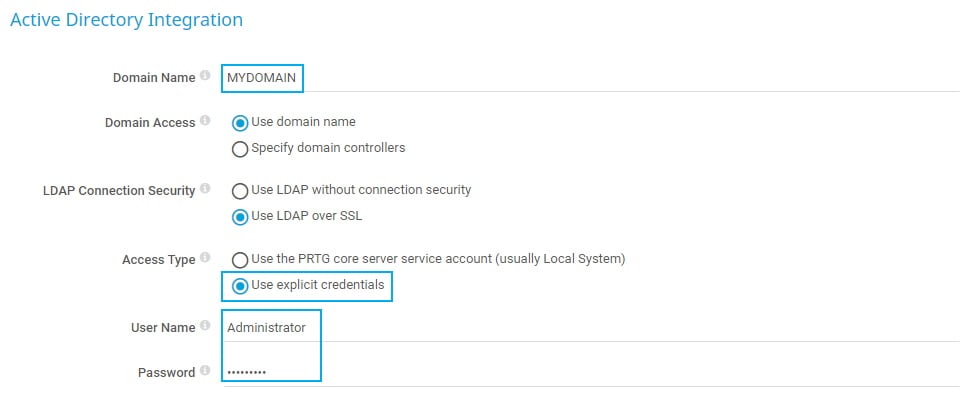
In the next step, you need to provide your local AD domain details in PRTG:
- Open the PRTG web interface and select Setup | System Administration |
Core & Probes from the main menu. - Go to section Active Directory Integration and enter your local AD domain name in the Domain Name field.
- Choose your preferred LDAP Connection Security
- Under Access Type, select Use explicit credentials to define the Windows service account that PRTG uses to authenticate against the AD.
 The service account must have the Read permissions, Read all properties, and List contents permissions for all your AD user groups.
 - Under User Name, enter the service account name that PRTG uses to access the AD.
- Under Password, enter the respective password of the service account.
- Click Save.
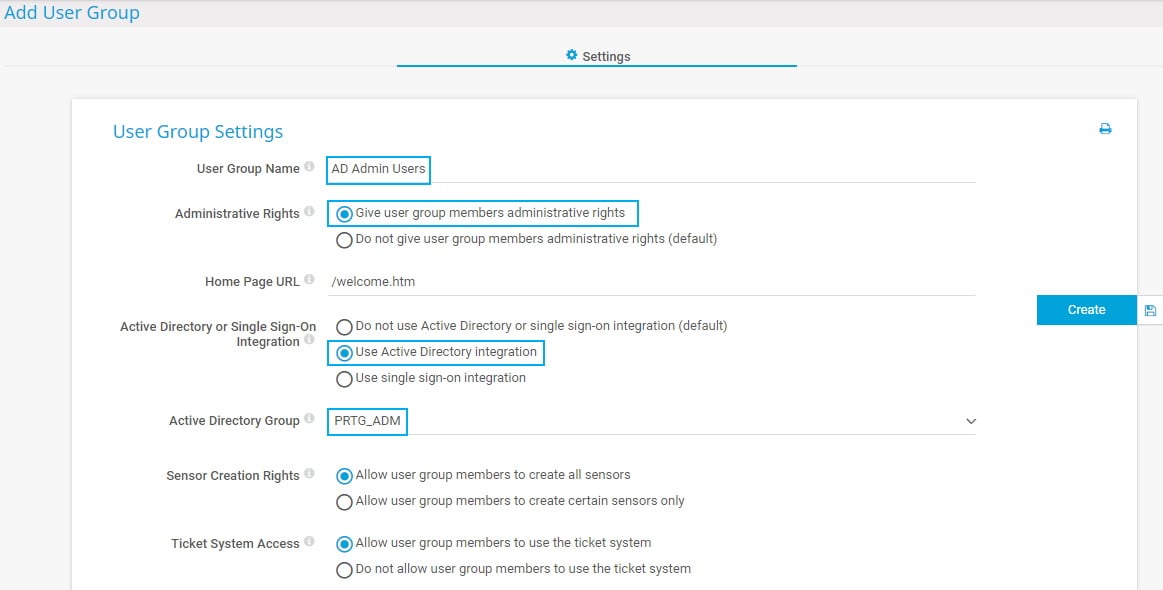
- In the PRTG web interface, select Setup | System Administration | User Groups from the main menu.
- Hover over
 and select Add User Group.
 - Provide a meaningful User Group Name.
- Under Administrative Rights, select Give user group members administrative rights.
- Under Active Directory or Single Sign-On Integration, select Use Active Directory integration.
- Under Active Directory Group, select the AD user group whose members later have access to PRTG. For our example, we chose the PRTG_ADM user group. For very large ADs, you see an input field instead of a dropdown list when you add or modify a user group. In this case, you can only enter the AD user group name. PRTG automatically adds the prefix.
Repeat these steps for the PRTG_RO user group to create a second group of users that have only read access rights for PRTG. In this case, leave the default setting under Administrative Rights.
Now, members of the defined AD groups can log in to PRTG with the respective access rights.
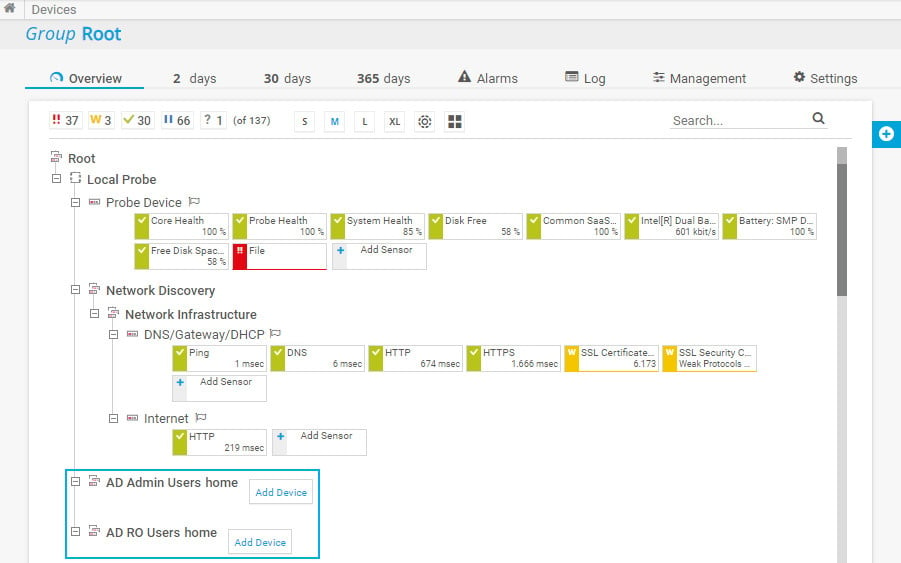
In the device tree, PRTG automatically creates new groups with the name [group_name] home for each of the integrated AD user groups.
Do not forget to set group access rights that apply to device tree objects as well as to libraries, maps, and reports. You can do so in an object’s settings in section Access Rights.
The easiest way is to set group access rights in the settings of the root group.
This how-to guide only scratches the surface?
Get more deep-dive information here!
Get more deep-dive information here!