![]()
How to set up scanning intervals
of sensors in 3 steps

![]()
Definition
A scanning interval is the amount of time that lies between two sensor scans
Fixed intervals
Certain sensors have fixed scanning intervals, for example the Common SaaS sensor. Changing fixed values of sensors is not possible.
Minimum intervals
There are also sensors that have a fixed minimum scanning interval for performance reasons. You cannot run these sensors in shorter intervals than this minimum interval.
Custom intervals
Other sensors have no specifications regarding scanning intervals. You can enter a scanning interval upon creation of the sensor. If you do not set one manually, the sensor will inherit the scanning interval defined in its parent object.

![]()
Scanning intervals shorter than 30 seconds usually do not give you more accuracy but cause unnecessary load on your machine and the network. Therefore, avoid intervals below 30 seconds.
![]()
Use mainly 1-minute scanning intervals for up to 2,000 sensors and 5-minute scanning intervals if you have more sensors.
![]()
"David vs. Goliath" sensors with only minimum load vs. sensors that create a lot of load on your system:
- Example David - Ping v2 Sensor: Ping requests only create minimal load so that you can choose a very short scanning interval without putting too much strain on your system.
- Example Goliath - Windows Updates Status (PowerShell) Sensor: The minimum scanning interval for this sensor is 1 hour, but we recommend that you set the scanning interval of this sensor to at least 12 hours to limit the load on the server being monitored.
![]()
Factory Sensor
Ensure that the scanning interval of the Sensor Factory sensor is equal to or greater than the scanning interval of the source sensor(s) to avoid incorrect sensor behavior. For example, "no data" messages or erratic changes of the sensor status can be a result of a scanning interval that has not been set properly.
Single sensors
Step 1
Right-click the desired sensor in the device tree and select Edit | Settings.
Step 2
Scroll to section Scanning Interval and click the Scanning Interval dropdown menu. Pre-defined scanning intervals in PRTG are 30s (30 seconds), 1m (1 minute), 5m, 10m, 15m, 30m, 1h (1 hour), 4h, 6h, 12h, and 1d (1 day).
Please remember that the performance impact of a sensor is related to the scanning interval. Sensors with a high performance impact and a short scanning interval will notably slow down your machine!
Step 3
Select one of these scanning intervals OR enable Inherit from… to use the scanning interval from the parent object.
Step 4
Click OK to save your settings.
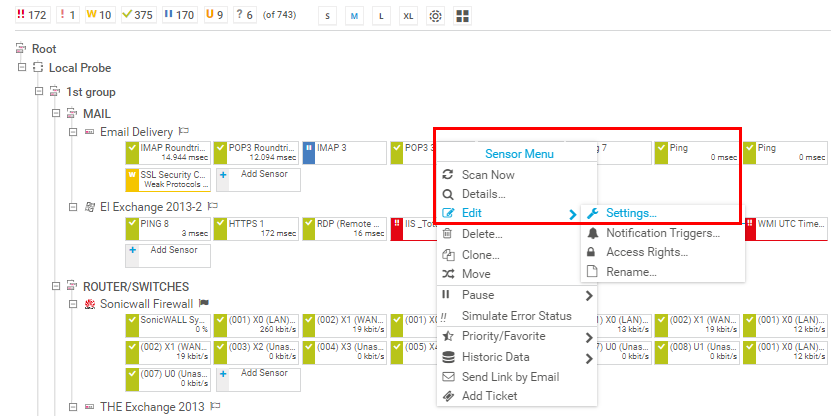
Settings of the desired sensor

Scanning intervals dropdown menu
Multiple sensors
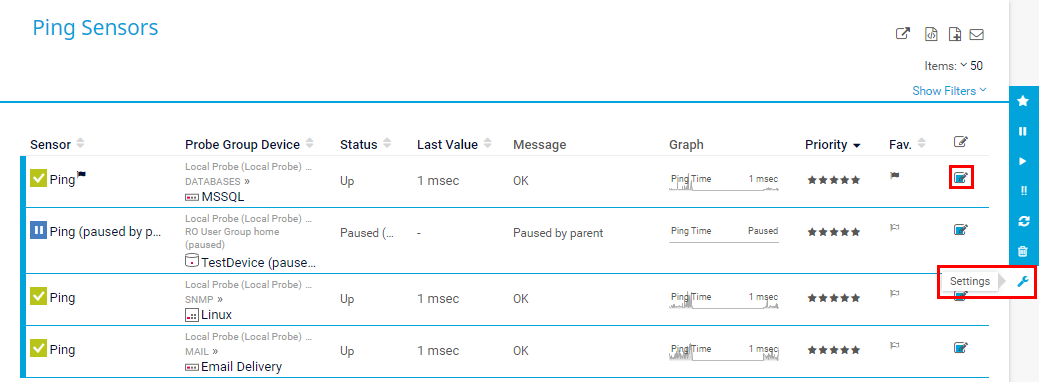
- From the PRTG main menu, select Sensors | By Type and select for example all Ping sensors.
- Click the multi-edit checkbox
 to select all sensors or only a set of sensors.
 - Click the wrench symbol
 in the multi-edit menu on the right side.
 - Scroll to Inherit Scanning Interval, select the Scanning Interval checkbox, and set the desired value to modify the scanning interval settings for all selected sensors.
- Click OK to save your settings.

Review your settings
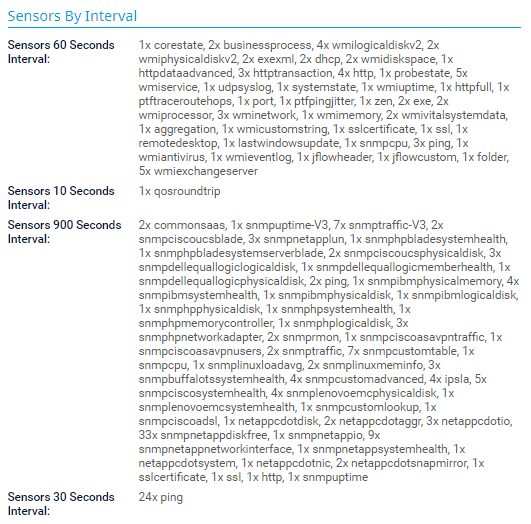
To get an overview of your scanning interval settings for your sensors, select Setup | PRTG Status from the PRTG main menu and click Sensors by Interval.
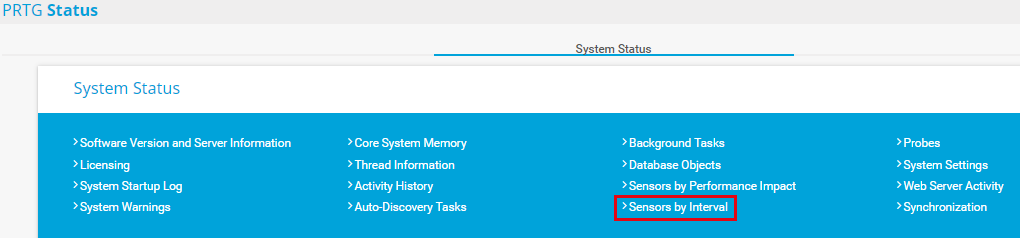
Here you can see which sensors of a certain type have which scanning interval (in seconds).
Want more?
Create your own scanning intervals

![]()
To create your own scanning intervals, select Setup | System Administration | Monitoring from the PRTG main menu.
![]()
In section Scanning Intervals, enter your own scanning intervals in the dropdown list. For example, 2h for 2 hours.
![]()
Click Save. Once you have saved, the customized scanning intervals will be available for selection.

This how-to guide only scratches the surface?
Get more deep-dive information here!
Get more deep-dive information here!